- Home
- Email Tips and Tricks
- Email Tricks: Shortcuts to Han ...

In everything we do, we often set the bar for ourselves—sometimes too high, other times just high enough to clear the hurdle. However, as the saying goes, “Nothing ventured, nothing gained!” It’s never too late to learn new tricks!
Email has become an integral part of our lives, seamlessly permeating our professional and personal worlds. A staggering 88% of people use email every day, spending up to 3 hours daily on reading and writing emails. Further, 39% of email users check their mailboxes three to five times daily. I wish we called our parents that often! Alas, email has hands down captured our attention.
We will give you a hand here with managing two of the most popular email clients: Gmail, which accounts for 29,68% of all email users, i.e., a whopping 1.8 billion, and Microsoft Outlook, which has around 400 million users. We will show you a few email tricks so that you can become a pro.
Tips for More Efficient Gmail Management
Customize your Gmail interface
It’s time to pamper yourself and have a go at tailoring your Gmail. Customizing your Gmail interface is a snap. To get started, click on the Settings cogwheel in the upper right corner and select the density view you prefer, from Comfortable to Compact, if you want to see more emails. Next, go down the drop-down menu and click on the Theme tab to choose from various Gmail themes and photo backgrounds. You can even upload your photo to make it more personal. Bingo! Are you happy with the new look? If not, you can always go back to the old Gmail layout.
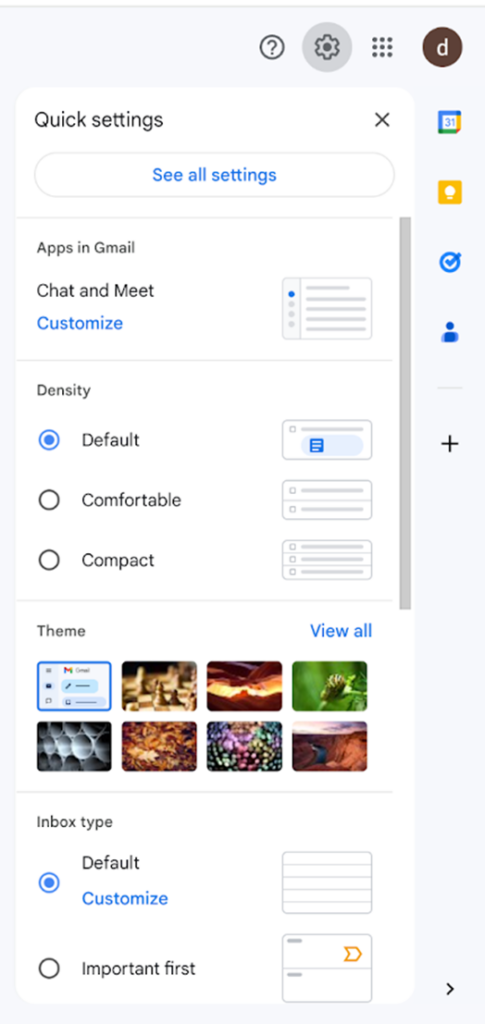
The next step towards customizing and enhancing your Gmail experience is to enable the shortcut cheat sheet. Doing this will allow you to navigate your mailboxes and messages faster, as well as format, archive, and delete messages with ease. Simply click on Settings, go to See all settings, scroll down to Keyboard shortcuts, select Keyboard shortcuts on, and click Save Changes. You are now on the fast track!
Manage multiple accounts efficiently
Tired of juggling multiple email accounts? You can turn your Gmail into a one-stop solution for all your email needs, especially since many people use four email addresses for different purposes. So, click on your profile in the upper-right corner of your Gmail and choose Add account. After typing in your second email address, click Next to enter the password for the account you just added. You are all set! Repeat the same steps to add more accounts.
To make your email life even easier, you can import emails from up to five non-Gmail accounts to your primary inbox. Follow these steps: In the upper right corner, select Settings, then go to See all settings and select the Accounts tab. In the Check mail from other accounts section, click on Add a mail account and simply enter the accounts you want to import messages from. Done!
Optimize email sending and receiving
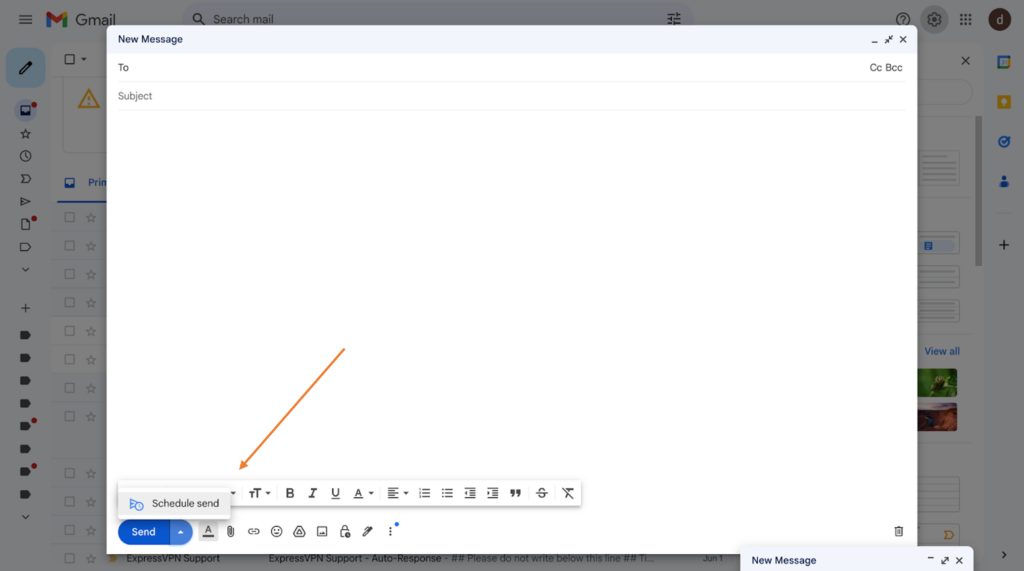
Whether you are an early bird or traveling in a different time zone, you may want to send your emails at a later time. Once your email is ready, press the drop-down arrow next to the Send button at the bottom left corner. Now, select the Schedule send option from the menu that pops up on top. The icon shows an arrow with a clock. The window that opens will offer preset times for the next morning, afternoon, or the following Monday morning. If that does not suit you, you can go to the bottom line of the same icon and click Pick date & time. Confirm your choice by clicking the Schedule send button. You are all set!
Another useful Gmail tip would be knowing how to configure your Gmail to send and receive emails from a different address, for example, from your business email (GSuite) or a different mail service. To do that, click the Settings cogwheel and go to the Accounts tab on the left. In the Send mail as section, click on Add another email address. Important notice: do not forget to verify your new address with the code that Gmail will send you!
Further steps to improve email organization
To further upgrade your Gmail experience, remember to not just label spam as such, but block senders altogether! Weeding out the unsolicited senders will give you peace of mind. Moreover, the annoying flood of offers from online stores and other vendors can be easily blocked by using the Unsubscribe feature shown in small print at the bottom of the email you don’t want to see. Just do it!
Now that you have decluttered your inbox, let’s move on to organizing messages. By dragging and dropping messages to labels and creating as many labels as needed, you will keep your inbox tidy and messages easily accessible. You can select as many emails as you need using advanced selection options.
Use Send + Archive: Make it a habit to automatically archive emails after sending replies. By moving sent emails out of your primary inbox view and reducing clutter, you will keep your inbox squeaky clean.
Maintain control, security, and focus
To add a few final touches to mastering Gmail like a pro, here are some further tips.
First, to have better control of your email, log out of Gmail sessions remotely. In the top right corner of Gmail, click on your photo, then click on Manage my Google Account, then click Security. Under Your devices, click Manage all devices and choose a device on which to sign out. Done!To better focus on your emails, hit the Mute (or Snooze) button on the right-hand side of your email. This will “snooze” emails until later.
Selecting all messages is also a helpful function to streamline your Gmail. To do that, click on the Select checkbox in the upper left corner. You can select all messages to delete, archive, move, or label.
Outlook Tips for Better Email Management
Organize and manage tasks
Outlook sports over 400 million users worldwide, trailing second after Gmail. Now is the time to share select Outlook tips and tricks with that devoted cohort.
Let’s first talk about how to create folders in Outlook to manage your tasks.
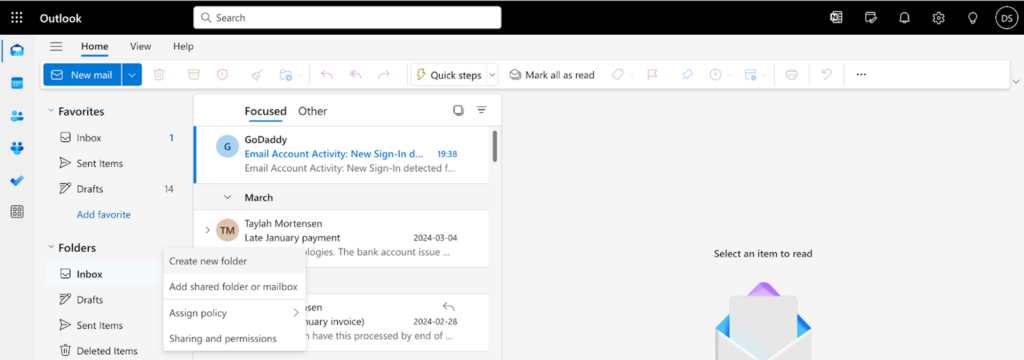
Creating folders in Outlook and using them to categorize and manage tasks is a breeze. In the navigation pane, right-click Folders, then select Create new folder. Name the new folder and save it. Right-click on the folder you have just created to create a new subfolder. Name it. Ok, you get it.
The next tip you may find useful is organizing your tasks with Microsoft To Do to integrate Outlook with Microsoft To Do for task management.
Sync Microsoft To Do with Outlook
Integrating Microsoft To Do with Outlook can be a game changer if you want to streamline your task management. Just follow the steps:
In the Outlook web version, click the app launcher (grid icon) in the top-left corner and select To Do. Your tasks will automatically sync with Microsoft To Do.
In the Outlook desktop version, go to the Tasks section, and make sure your tasks are visible. If you’re using the same Microsoft account, they will sync automatically with Microsoft To Do.
Creating tasks in Outlook that appear in To Do
Select an email in Outlook, drag it to the Tasks icon, and select Follow Up -> Add Reminder. Congrats! You have created a task that is in sync with Microsoft To Do.
Automate and categorize emails with Outlook
Outlook offers tools to help you automate and categorize your inbox, boosting your productivity.
Create Outlook rules to automatically sort emails
Outlook rules automate email management by sorting incoming emails into designated folders based on criteria like sender, subject line, or keywords. Here’s how you set it up:
- Go to Settings: Click the gear icon in the top-right corner and select View all Outlook settings.
- Create a new rule: Under Mail, choose Rules and click Add new rule.
- Define criteria and action: Specify conditions (e.g., sender) and choose actions (e.g., move to a folder).
Categorize your emails with labels
Labels help you visually organize and prioritize your emails. Follow these steps:
- Create labels: In settings, go to Labels and create categories like Work or Urgent.
- Apply labels: Select emails, right-click, and choose the appropriate label. Set up rules to auto-label incoming emails.
- Organize by labels: Use the search function to filter emails by labels.
Streamline email composition
Quite often, your work emails consist of recurrent texts. To handle such routine tasks more efficiently, here are some useful Outlook tips. First, you can use My Templates in Outlook for such repetitive email tasks. Here is how that is done, in a nutshell.
Begin by composing a new email. Click on New Email to open a blank message. After you have composed your email with all the elements that you want to remain unchanged in your repetitive emails, save it as a template. In the email window, click on File, select Save As, and in the Save as type dropdown menu, choose Outlook Template. Name it to easily find it and save it in the default templates folder. You can now use it whenever you need it!
Now, let’s add a final touch to the Outlook tips and tricks collection.
Automate repetitive tasks with Quick Steps in Outlook
To breeze through your email tasks like a pro, you can automate repetitive tasks with Quick Steps, a set of customizable actions that streamline your email workflow. To set up Quick Steps, open Outlook and head to the Home tab. In the Quick Steps section, you’ll find options like Move to and To Manager. You can use these or create your own. Click Create New, give your Quick Step a name, and define what it should do—move an email to a folder, mark it as read, or flag it for follow-up.
How to use Quick Steps
Once your Quick Step is set up, just select an email and click on your Quick Step in the gallery. Your email is now sorted, flagged, or whatever action you set up, all in one click.
To Sum Up
By customizing your Gmail interface, managing multiple accounts efficiently, scheduling emails, blocking unwanted senders, and using labels, you can turn Gmail into a formidable tool. Likewise, with Outlook, you can streamline your tasks using folders, integrate Microsoft To Do, automate emails with rules, categorize with labels, and utilize Quick Steps for repetitive tasks. Put these tips into practice to handle your email like a pro!