Adding and managing tags
Tags in Sendigram are flexible labels you can apply to contacts to organize, segment, and target your audience more effectively. They act like keywords that help you filter and personalize campaigns without needing to create multiple lists.
1. What Are Tags?
- Tags are custom labels you assign to contacts.
- A contact can have multiple tags.
- Examples:
- “VIP”
- “Webinar_Attendee”
- “Product_A_Buyer”
- “Inactive_90days”
2. Adding Tags to Contacts
A. Add Tags Manually
- Go to Contacts → Lists.
- Select a contact.
- Click Edit Contact.
- Add one or more tags in the Tags field.
- Save changes.
B. Bulk Tagging
- Select multiple contacts in a list.
- Choose Bulk Actions → Add Tags.
- Apply one or more tags to all selected contacts.
C. Add Tags via Import
- Include a “Tags” column in your CSV/Excel file when importing contacts.
- Sendigram will automatically assign tags from your file.
D. Automations
- In a workflow, use the Add Tag action to label contacts dynamically (e.g., tag as “Engaged” after clicking a link).
3. Managing Tags
- Go to Account Settings → Tags to see all existing tags.
- From here you can:
- Rename tags (updates all contacts with that tag).
- Merge tags to combine duplicates (e.g., “VIP” and “Vip”).
- Delete tags — this removes them from all contacts but does not delete the contacts themselves.
4. Using Tags in Campaigns
- Segments: Create a segment of contacts with specific tags (e.g., Tag = Webinar_Attendee).
- Personalization: Insert tag-based content (e.g., special offers for “VIP” contacts).
- Exclusions: Exclude tagged groups from a campaign (e.g., exclude Already_Purchased).
Tags
A Tag is a simple, unstructured label that you attach to a contact to categorize them or mark a specific behavior, interest, or status.
A single contact can have many tags (or none at all).
Use Tags to answer questions like "Did they" or "Are they":
- Did they attend our webinar? (Tag: Attended_Webinar_Sept2024)
- Are they a VIP customer? (Tag: VIP_Customer)
- Are they a sales lead? (Tag: Sales_Lead)
- Did they click a specific link? (Tag: Clicked_ProductA_Link)
Key characteristics of Tags:
- Unstructured Data: They are simple labels or keywords.
- Flexible & Temporary: Tags are perfect for marking temporary states, actions, or interests. A contact can gain and lose tags frequently based on their behavior.
- Used for Grouping: They are ideal for grouping contacts from different lists who share a common characteristic (e.g., everyone tagged Interested_In_Automation).
- Action-Based: Tags are often added or removed based on what a contact does (e.g., opens an email, clicks a link, makes a purchase).
- Email (required, unique)
- First Name, Last Name
- Phone number
- Company
- Subscription status (active, inactive, unsubscribed)
- You can also add custom parameters like “Birthday,” “Customer ID,” or “Favorite product.”
Viewing Contact attributes
- Go to Contacts and click on the contact whose attributes you want to see..
- You’ll see all standard and custom attributes for that contact.
Adding custom attributes
You can add new fields and tags for your contacts.
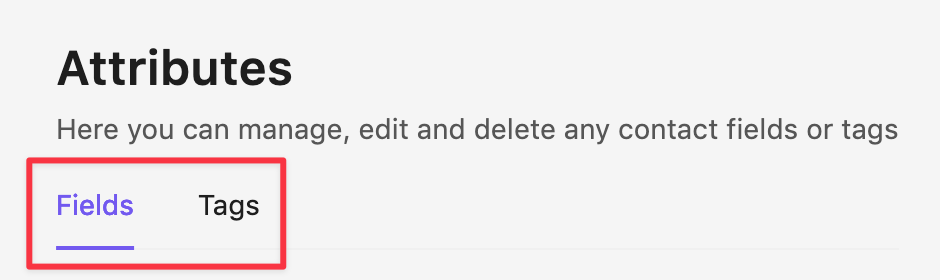
- Go to Contacts → Attributes.
- Switch between two tabs—Fields and Tags in the upper left corner.
- Click Create a new field/tag. Enter the name for this new field and choose among multiple field options:
- Text (e.g., City)
- Number (e.g., Age, Order count)
- Date (e.g., Birthday, Signup date)
- Save — the new parameter is now available across all contacts.
Editing contact attributes
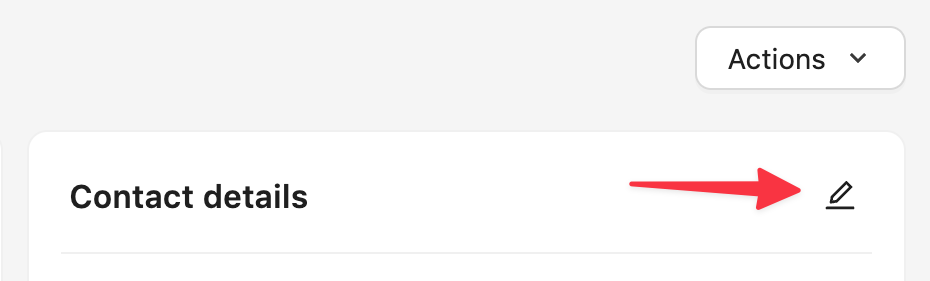
1. Open the contact you want to modify.
2. Click the Edit button.
3. Modify fields, groups and tags for the contact.
4. Click the Actions button.

5. In the dropdown list you’ll be able to send a new message to this contact or delete it.
Using attributes in campaigns
- Personalization: Insert parameters into emails (e.g., Hello, {{First Name}}).
- Segmentation: Build dynamic segments based on parameter values (e.g., City = London or Orders > 3).
- Automation: Trigger campaigns based on parameters (e.g., Birthday emails using the Date field).
Deleting attributes
- Go to Account Settings → Contact Fields.
- Select the parameter → Delete.
Deleting an attribute removes it from all contacts and may break campaigns or segments using it.